While the market is hugely accepting REST based architectures due to their light weight nature, there is a strong need to secure these web services from various forms of web attacks. Since it is stateless in nature, the mechanisms of securing these services are different from standard web application where it is easily handled by session management, but in the case of REST, no session can be maintained as the calling point may or may not be a web browser.
There are several mechanisms available to secure the web service. Some of these options are: HTTP Basic, HTTP Digest, Client certificates and two legged oauth 1.0, OAuth 2.0. All of the above mechanisms can be picked along with the transport layer security using SSL. These methods have their own pros and cons which can be easily referenced from various books and web.
This paper will primarily focus on implementing security using Spring Security for OAuth 2, an implementation of OAuth 2.0 Open Authorization standard.
As against other API implementations, REST kind of API implementation has proliferated inside the enterprise and outside. At the same time, the APIs security is still in question and not mature. Because of the following reasons:
REST architecture does not have pre-defined security methods/procedures. So developers define their own side of implementation.
REST API is vulnerable to the same class of web attacks as standard web based applications. These include: Injection attacks, Replay attacks, Cross-site scripting, Broken authentication etc.Limited documentation/library/framework available to implement standardized OAuth 2.0 specification (see references)
OAUTH 2.0 overview
OAuth 2.0 is an open authorization protocol specification defined by IETF OAuth WG (Working Group) which enables applications to access each other’s data. The prime focus of this protocol is to define a standard where an application, say gaming site, can access the user’s data maintained by another application like facebook, google or other resource server. The subsequent section explains the implementation of OAuth 2.0 in RESTful API using Spring Security for OAuth for Implicit Grant Type. Those who are not familier with the OAuth roles and grant types can refer to APPENDIX A OAuth 2.0 Overview.
The following diagram gives an overview of steps involved in OAuth authentication considering a generic implicit grant scenario.
Figure 1: Steps involved in User Authentication
User enters credentials which are passed over to Authorization Server in Http Authentication header in encrypted form. The communication channel is secured with SSL.
Auth server authenticates the user with the credentials passed and generates a token for limited time and finally returns it in response.
The client application calls API to resource server, passing the token in http header or as a query string.
Resource server extracts the token and authorizes it with Authorization server.
Once the authorization is successful, a valid response is sent to the caller.
Spring security for oauth 2.0
Spring Security provides a library (Apache License) for OAuth 2.0 framework for all 4 types of Authorization grants.
NOTE: From the implementation details perspective, this paper focuses on Implicit grant type used mostly in browser based client and mobile client applications where the user directly accesses resource server.
Spring Security Configuration
The xml configuration used for Implicit grant type is explained below.
Enable Spring Security configuration:
To enable spring security in your project, add this xml in the classpath and enable security filters in web.xml file as:
Token Service is the module which Spring Security OAuth 2.0 implementation libraries provides and it is responsible to generate and store the token as per the default token service implementation.
The tokenStore ref bean represents the token store mechanism details. In memory token store is used for good performance considering the web server has optimum memory management to store the tokens. Other alternative is to use a database to store the tokens. Below is the bean configuration used:
Authentication Manager is the module which Spring Security OAuth 2.0 implementation libraries provide and it is responsible to do the authentication based on the user credentials provided in request header [or by other means i.e using query parameters] before the framework issues a valid token to the requester.
Authentication Manager will further tie with the Authentication provider. Authentication provider will be chosen based on the underline system used to store operator details. Spring OAuth library supports various AAA systems that can be integrated and act as Authentication Provider.
Authentication manager will create a context object for the LDAP and verify the provided operator credentials in the request header with the details stored in the LDAP. Once authentication is successful, request will be delegated to the token service.
If Authentication is success then Token Service will first check whether a valid token is already available or not. If a valid [non-expired] token is available then that token will be returned otherwise a new token will be generated based on the token generator and added to the database and also returned as response body.
If authentication fails then 401 Unauthorized will be returned as response header.
Generate/Get access token
As per the OAuth 2.0 specification, user has to make a request for the token with certain parameter and the framework should provide a valid token to the user once authentication is done.
To access any API resource first client has to make a request for the token by providing his/her credentials in basic auth header.
Authentication Manager will do the authentication based on the credentials provided in auth header.
Below http block will receive the token request initiated by the user.
As per the OAuth 2.0 specification token request must be initiated along with these parameters. Details are given below:
response_type: It tells that this request represents the token request.
client_id: It represents the 3rd party user if token request is initiated by that. In our case there are no 3rd party users who need access to the application on behalf of operator.
redirect_uri: The URL where request will be redirected with token and other details if authentication is success.
2. API authorization based on user details stored in LDAP
On successful authentication via OAuth4AuthenticationProcessingFilter (authentication filter), the API Authorization layer is invoked. For customized authorization implementation, Authorization server is implemented and called from AuthenticationProcessingFilter by extending the class.
Authorization Server
This module is responsible to approve the token request initiated by the client. The decision would be approved by user approval handler after verifying client credentials provided in the request.
This handler is used to approve the token request initiated by client. In case of implicit grant type it has functionality of automatic approve for a white list of client configured in the spring-security.xml file.
The authorization server, checks for the access of the URI and http method for the user (API caller).
If user is not authorized 401-Unauthorized status is set as response and authentication object is not set to the security context.
applying cluster aware cache
The OAuth token management can be done using some persisted mechanism or it can be maintained as part of process memory.
Application of memory cache for OAuth short lived token management can be used for optimal performance. And if the application is required to run in a clustered environment, a cluster aware cache mechanism is the way to go. Rest of the section explains the usage of JBoss cache for token management.
Below is the configuration used to enable jboss caching, if JBoss AS 5.1 is the app server:
<entry><key>api-token-store-cache</key><value><beanname="ApiTokenStoreCacheConfig"class="org.jboss.cache.config.Configuration"><!-- Provides batching functionality for caches that don't want to interact with regular JTA Transactions --><propertyname="transactionManagerLookupClass">org.jboss.cache.transaction.BatchModeTransactionManagerLookup</property><!-- Name of cluster. Needs to be the same for all members --><!--property name="clusterName">${jboss.partition.name:DefaultPartition}-SessionCache</property--><!-- Use a UDP (multicast) based stack. Need JGroups flow control (FC) because we are using asynchronous replication. --><propertyname="multiplexerStack">${jboss.default.jgroups.stack:udp}</property><propertyname="fetchInMemoryState">true</property><propertyname="nodeLockingScheme">PESSIMISTIC</property><propertyname="isolationLevel">REPEATABLE_READ</property><propertyname="useLockStriping">false</property><propertyname="cacheMode">REPL_ASYNC</property><!-- Number of milliseconds to wait until all responses for a synchronous call have been received. Make this longer than lockAcquisitionTimeout.--><propertyname="syncReplTimeout">17500</property><!-- Max number of milliseconds to wait for a lock acquisition --><propertyname="lockAcquisitionTimeout">15000</property><!-- The max amount of time (in milliseconds) we wait until the state (ie. the contents of the cache) are retrieved from existing members at startup. --><propertyname="stateRetrievalTimeout">60000</property><!-- Not needed for a web session cache that doesn't use FIELD --><propertyname="useRegionBasedMarshalling">true</property><!-- Must match the value of "useRegionBasedMarshalling" --><propertyname="inactiveOnStartup">true</property><!-- Disable asynchronous RPC marshalling/sending --><propertyname="serializationExecutorPoolSize">0</property><!-- We have no asynchronous notification listeners --><propertyname="listenerAsyncPoolSize">0</property></bean></value></entry>
 Product Engineering Services Customized software development services for diverse domains

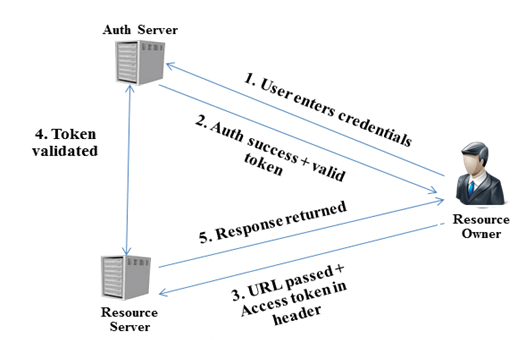
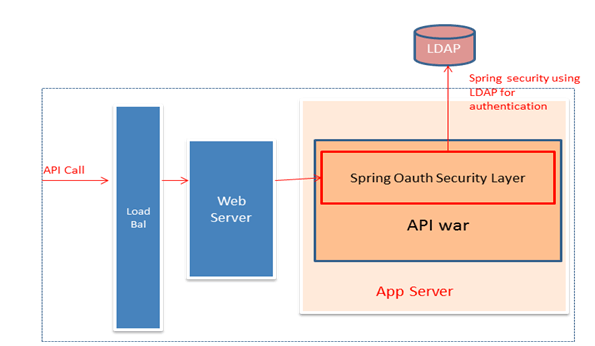 Figure 2: OAuth security layer access LDAP for operator access control