Most Android-powered devices have built-in sensors that measure motion, orientation, and various environmental conditions. These sensors are capable of providing raw data with high precision and accuracy, and are useful if you want to monitor three-dimensional device movement or positioning, or if you want to monitor changes in the ambient environment near a device. For example, a game might track readings from a device’s gravity sensor to infer complex user gestures and motions such as tilt, shake, rotation, or swing.
The Android platform supports three broad categories of sensors:
motion sensors
environmental sensors
position sensors
In the Android system, some of the sensors are hardware-based, while others are software based.
Android allows application developers to obtain the raw data from these sensors in order to be able to then use it in the application. For this purpose, Android provides user with some Viz class files: SensorManager and Sensor.
Therefore, one can access the sensors available on the device and acquire raw sensor data by using the Android sensor framework. This sensor framework provides several classes and interfaces that help you perform a wide variety of sensor-related tasks. For example, the sensor framework can be used to do the following:
determine which sensors are available on a device
determine an individual sensor’s capabilities – such as its range, manufacturer, power requirements, and resolution
acquire raw sensor data and define the minimum rate at which you acquire sensor data
register and unregister sensor event listeners that monitor sensor changes
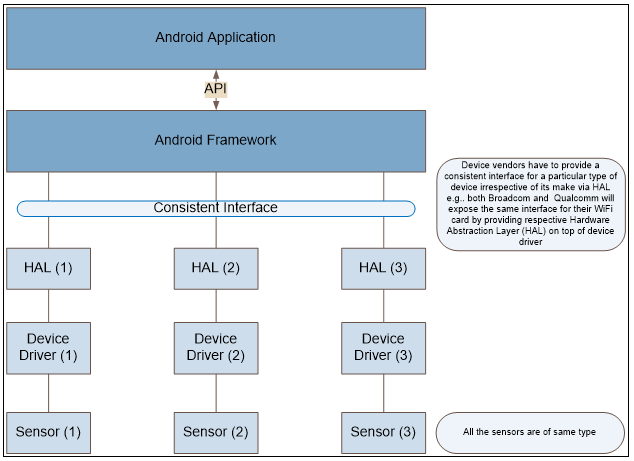
The interface between the hardware drivers and the Android framework is known as the Sensors Hardware Abstraction Layer (HAL) API. And the Sensors Software Development Kit (SDK) API is the interface between the Android framework and the Java applications.
If one registers a “SensorEventListener” object for a sensor, whenever the sensor data changes, the listener will be notified.
Depending upon usage and the nature of the sensor, it’s possible to enable or suspend sensor using onPause() and onResume methods.
Overview
The rest of this post describes a proof of concept activity for the integration of the sensor at a middleware level to the Android Framework.
Goals Of The Activity
add support for a new category of sensors in Android framework: Medical Sensors
connect a medical sensor to the Android platform and develop a working prototype where an Android application is able to:
detect the connected medical sensor device
receive data from the medical sensor
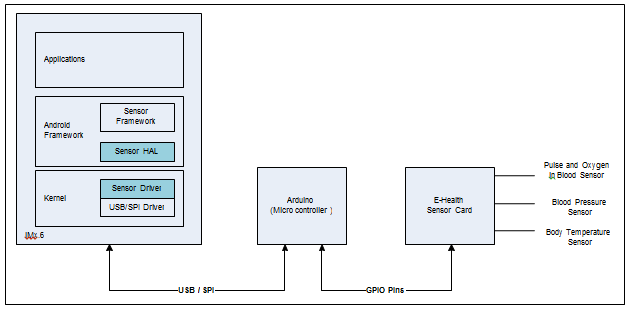
Hardware Description
Connection With Android Development Board
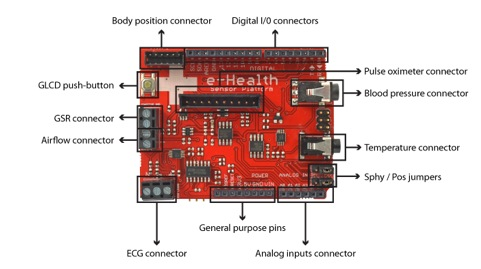
E-Health Sensor Card & Sensors
By using nine different sensors, the e-Health Sensor Shield allows Arduino users to perform biometric and medical applications where body monitoring is needed. This information can be used to monitor (in real time) the state of a patient or to get sensitive data in order to be subsequently analyzed for medical diagnosis. The biometric information gathered can then be wirelessly sent using any of the connectivity options available: Wi-Fi, 3G, GPRS, Bluetooth, 802.15.4 and ZigBee, depending on the application.
In the test activity, the E-Health medical sensor card was used to connect medical sensors and the microcontroller. The E-Health card has analog connectors for connecting sensors and provides digital input/output pins for connecting to microcontrollers. Pulse and oxygen sensor, a blood pressure sensor and body temperature sensor were used to demonstrate the control of sensors from the Android application.
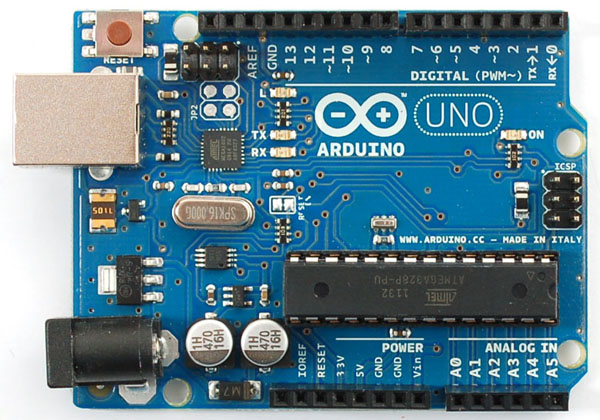
Adruino Microcontroller
The Arduino board has an 8-bit ATmega328P microcontroller with 32 KB flash, 1KB EEPROM and 2KB RAM. This Arduino microcontroller provides SPI and USB interface. The microcontroller runs a small embedded code to handle interrupts generated by the sensor card and read/write data from/to the sensor card. The embedded code also manages the data transfer on the USB interface.
The microcontroller specifications were:
Microcontroller
ATmega328
Operating Voltage
5V
Input Voltage (recommended)
7-12V
Input Voltage (limits)
6-10V
Digital I/O Pins
14 (of which 6 provide PWM output)
Analog Input Pins
6
DC Current Per I/O Pin
40 mA
DC Current For 3.3V Pin
50 mA
Flash Memory
32 KB (ATmega328) (of which 0.5 KB used by bootloader)
SRAM
2 KB (ATmega328)
EEPROM
1 KB (ATmega328)
Clock Speed
16 MHz
The I/O port of the microcontroller was used to connect to the E-Health sensor card. The Arduino microcontroller was connected to the Android development board over USB interface.
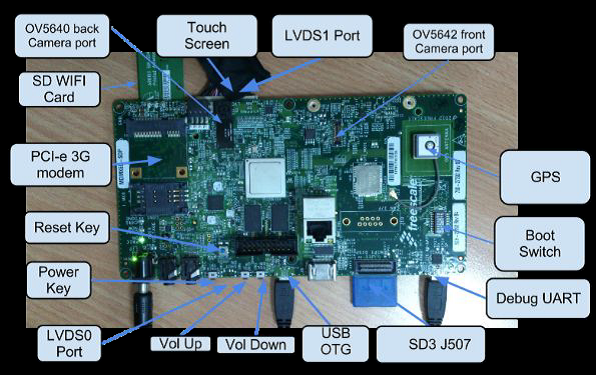
Android Development Board
A freescale SABRE board, powered by an ARM Cortex A9 Quad core iMX6 processor, was used in this project. The hardware specifications of the board were:
Freescale Sabre-SD Board
Processor: Freescale-IMX6 (Cortex -A9)
Android Version: 4.2 (Jelly Bean)
Ram: 1GB DDR3
Android 4.2 Jelly Bean image (provided by Freescale) was flashed onto the SABRE board. This board was connected to the Arduino microcontroller over USB.
Development Details
he code for the sensor HAL is located at the following path in AOSP code base (received from FreeScale): /hardware/imx/libsensors”. The medical sensor was integrated in this HAL for the existing sensor “ID_T”. This sensor HAL reads the Pulse data sent by E-Health card mounted on Arduino board, attached to an OTG port on IMX6 Board.
To display the values received from the medical sensor, a small application was written viz. SensorDemo. For now, the application displays the last 50 readings only, which may be altered later.
Further work may be done to add a new SENSOR TYPE in the Android framework itself so that device manufacturers can plug in a sensor of that TYPE by simply providing HAL for the same. That way the interaction between the application and hardware will be automatically handled by the framework and the application can simply request to receive data by using framework APIs.
Changes Done In init Configuration File
The init.rc file was modified to add the entry of daemon so that it gets started upon Android system boot.
Changes Done At Hardware Abstraction Layer (HAL)
As previously mentioned, the Android system already has support for some sensors. We modified an existing HAL, for one of the sensors viz. “ID_T”. The code for HAL was modified so that it reads the events from the event file to which the daemon is writing.
Changes Done In Android Framework
No changes were needed at the Android Framework level since an existing HAL was reused. Essentially, the medical sensor class was treated as a sensor class which is already supported at framework level.
Development At Application Layer
A simple Android application for reading sensor data was developed. The sensor data was then read by using the sensor framework. The application displays the last 50 readings from the sensor.
Reading Data From Arduino Board (Used For Verification & Testing Purposes)
The data coming in through the USB interface of the Freescale board can be also obtained by reading the serial terminal file directly:
cat /dev/ttyACM0
This mechanism was used to validate that the sensor data was being transmitted correctly, in real time, across the Android framework to the application layer.
Thank You!
Thank you for contacting us. We will get back to you soon.
X
We will get back to you!
Thank You!
Thank you for contacting us. We will get back to you soon.
 Product Engineering Services Customized software development services for diverse domains